Double Braid Rope Eye Splice
Machovec is proud to bring you these rope splicing instructions. Eye splicing a rope is one of the most asked for procedures. Having a permanently fixed loop (eye splice) on a rope end removes the need to tie and then untie a knot each time you wish to use it. Rope splicing is a very strong method of fixing a loop eye; as the rope is pulled tighter so the spliced strands become more and more squeezed and locked into place. Rope splicing removes the worry of a knot becoming undone and a spliced eye is less bulky. You can buy 3-strand, 8-strand or 12-strand rope with an eye already spliced in or you you can make your own by following these instructions for eye splicing a rope.
 STEP 1
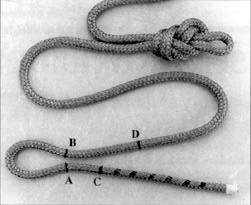
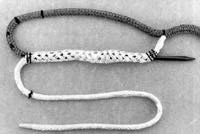
From the end of the rope, measure back 1 full fid length, mark this A. Using mark A as a reference, form the desired eye size and make mark B on the rope directly opposite mark A. From mark B, measure one long fid section (down the body of the rope) and make mark D. From mark D measure down the rope approximately 5 full fid lengths and tie a slip knot or figure 8 knot in the rope. From mark A count 8 consecutive left or right strands toward the end of the rope and make a heavy mark completely around the rope. This is mark C. From mark C count 5 consecutive left or right strands toward the end of the rope and mark the 5th left and right pair. Continue counting and marking in this 5:4 sequence to the end of the rope.
 STEP 2
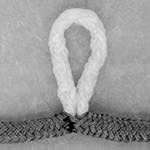
Bend the rope sharply at mark B and carefully spread the cover strands to expose the core. Pry the core braid out from the cover. Use care to avoid pulling any of the cover strands. Pull the end of the core completely out of the cover.
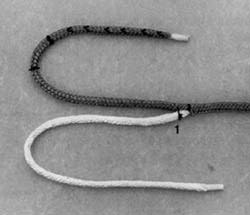 Tightly tape the end of both the cover and the core braids. Holding the exposed core, slide the cover braid back to the knot. Then hold the knot and slide the slack cover back down the core in the direction of the end of the rope until all of the slack has been removed. Mark the core at the point where it exits from the cover. This is mark 1 below.
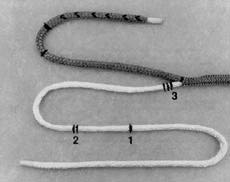 Once again, slide the cover toward the knot. Measure one short fid length from mark 1, toward the knot and make two marks that go completely around the core. This is mark 2.
From mark 2, measure one full fid length plus a short fid length toward the knot and make three marks completely around the core. This is mark 3 below.
 STEP 3
Using masking tape place two wraps of tape around the bitter end of the cover. Taper this by cutting the end at a 45° angle. Attach the fid hoot through the cover and tape the tapered point to the fid as shown below. Insert the fid into the hollow core at mark 2 and out at mark 3. When exiting or entering the braid with the fid, always go between strands.
Pull the fid with cover tail through the core until mark A on the cover is exposed at mark 3 on the core. (below) Remove the fid.
STEP 4
Remove the tape from the end of the cover. Cut and remove the marked strand pairs, starting at the end of the cover and working back to mark C.
Pull cover back out of core at mark 2 until mark C on the cover is aligned with mark 2 on the core. To prevent the cover tail from disappearing inside the core, tie a loose overhand knot in the end of the cover. Vise grips or a long piece of tape may also be attached to the cover tail to keep it in place.
 STEP 5
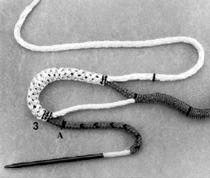
Attach the fid to core tail using the procedure described above. Insert the fid into the cover at mark C and out at mark D. Pull core tail through at mark D until all the slack has been removed. Remove the fid from core tail.
NOTES:
- The rope may be extremely tight where the fid is traveling between marks C and D. To create more space in this area, grasp the core as it exits the cover at point B and pull extra core out of the rope. This will cause the cover to pucker and give you some extra space.
- If the distance between C and D is longer than the length of the fid, hold the fid in place by squeezing it through the cover braid. Slide the cover slack back from the fid to mark C to draw the core tail into the cover. Then continue working the fid through the cover to mark D. Repeat as necessary.
- Avoid snagging the core with the tip of the fid when it is passing through the cover in the vicinity of mark B. To check if the core has been snagged, pull on the exposed core where it exits from the cover at mark B. If the core moves freely, it's OK to proceed. If the core appears to be stuck, pull the fid back until the core is no longer snagged and continue.
 STEP 6
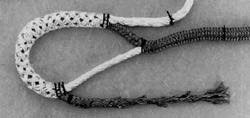
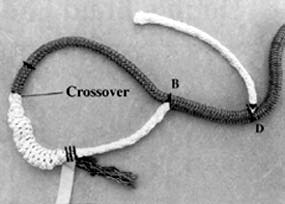
The crossover is the point where mark C on the cover and mark 2 on the core meet. To tighten, hold the rope at the crossover point and alternately pull on the free ends of the cover and core. Continue this process until the crossover is approximately the same diameter as the rope.
To bury the cover tail, untie the lose knot (or remove the tape or vise grips used in step 4). Hold the rope at the crossover and smooth the core toward the cover tail, which will disappear.
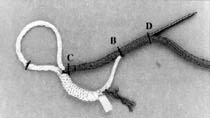
To bury the core tail, hold the crossover and smooth out the slack in the cover braid from the crossover down to mark D. Repeat this process several times to remove all cover slack. Most of the core will disappear, however, some of the core tail will still remain at mark D after this process. Mark the core tail where it exits from the cover at mark D. Then mark the core tail at mark B by inserting the marking pen into the opening at mark B.
Pull out the core tail at mark D until the mark made at B appears. Cut off the excess core tail at the first mark (the one nearest the end of the core) and unbraid the core tail back to the second mark. Fan out the strands. Cut the strands at a 45° angle starting at a point about half way back from the end.
Again, hold the rope at the crossover and smooth the cover braid from the crossover toward mark D. The exposed core will disappear completely inside the cover.
STEP 7
Score the knot tied in the body of the rope to a solid anchor point. Since a good deal of tension may be placed on the rope when burying the splice, the anchor point should be very sturdy.
The slack in the cover braid between the knot and mark B will be used to bury the exposed core, crossover and cover down to mark A to produce the desired size eye. This is accomplished by holding the rope at the top of eye and sliding the cover slack back from the knot towards the splice. Milk the cover from the crossover around the radius of the eye to the throat at B and pull that leg sharply with a spike to help seat the splice. Flex and/or hammer the splice section to loosen the fibers.
Seize or cross-stitch the eye to finish the splice. Refer to the diagrams at the top of this page.
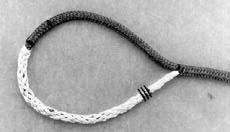
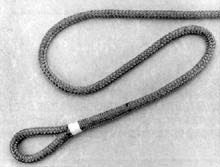
NOTE: If insufficient tension is placed on the rope while making up the slack, the crossover may tend to bunch up. If this happens, slide the cover slack back toward the knot until the crossover is the proper size. (top image above) Then repeat the milking procedure. (bottom image, above).
We hope you found these rope splicing instructions helpful. If you require any further assistance, feel free to call Jay @ 763-263-9835.