THE POSTMAN'S BRIDGE
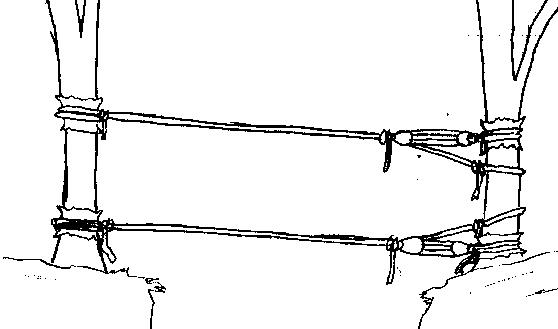 These suspension bridges consists of two ropes, one above the other both fixed and tensioned as for the single Crawl Rope. The ropes should be positioned apart by about the distance from foot to shoulder of the largest person to use the suspension bridge. This keeps the weight between the ropes. Process across the rope bridge by standing on the lower rope and shuffling across whilst holding onto the upper rope.
It is best if this rope bridge is used to actually cross a dip or depression in the ground so that access to the lower foot rope is not too high a step up. If the lower rope is too near the ground then there is a possibility of actually touching the ground at the center of the rope bridge. See illustration below of two ropes crossing a gully.
Tip - It is better to put more tension on the upper rope so that when persons crossing get to the center, the hand rope does not give more than the foot rope, and cause the whole bridge to turn over and dump the user off.
Safety Note: Similar regards to safety should be in place for this bridge as for a single Crawl Rope.
PICKET BRIDGE
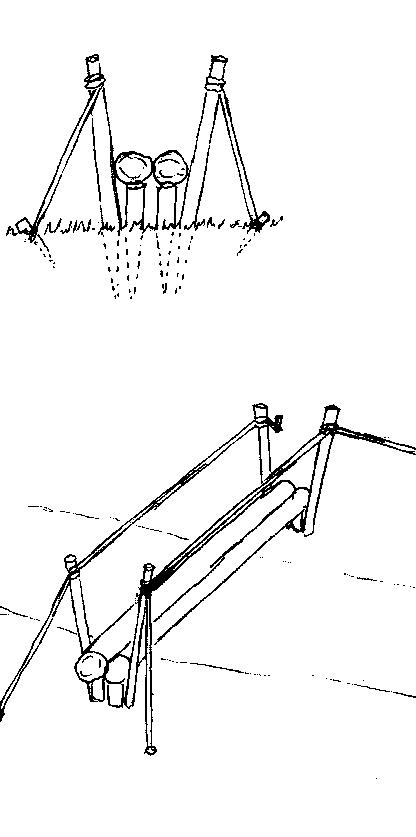 At each end of these suspension bridges two short stocky pickets are driven into the ground. These support the foot bridge which consists of two spars resting on the pickets. Two longer pickets are driven in either side of the spars at each end of the suspension bridge to prevent the spars rolling sideways and to support the handrails. The hand rails are rope and can be tensioned to large pegs at either end. Alternatively, the handrails can be additional spars lashed to the upright pickets. If they are square lashed on the outside of the pickets there is more room for persons crossing the bridge. Alternatively, the foot bridge can comprise of three spars (for additional width) resting on three pickets and in either case the foot bridge spars can be lashed together for rigidity.
On the illustration, the upper picture is the layout of spars and pickets at both ends of the suspension bridge.
MONKEY BRIDGE / ROPE BRIDGE
Equipment:
- Main rope minimum 20mm, preferably larger
- A large tree - this saves having to set up two ground anchors
- Sacking to save the tree bark from damage
- Ground anchor of some sort - if you do it right it is hard work
- A billy to suit the main hawser
- Four longish pioneering poles, jute and lashings
- Four guy ropes and anchors per sheer leg
Method:
Wrap jute around tree. Capstan main rope around tree three times and tie off with two half hitches. (Three turns and two half hitches).
Draw hawser out towards anchor where it is fed through billies and pulled taught and tied off with round turn and two half hitches on ground anchor. Excess hawser can be daisy-chained for security, and/or laid in loops over the tensioned hawser from the sheer legs towards the ground anchor.
Poles are used to make sheer legs which are then placed under taught, but not rigid, hawser placing sacking in the fork in the sheer legs. Sheer legs are opened and raised. Butted into the ground and guyed off. Note: Everything must be in a dead straight line, or the sheer legs will flip over.
All you need to do is use steps at either end of the bridges and teach how to cross the rope bridges.
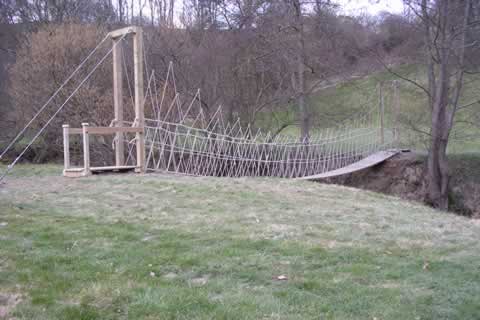
If you then add further lines about a meter and a half up the upper end of the sheer legs, parallel to the main hawser and draw them tight using a Prussic knot on a loop and brute force you create what is described as a Monkey Bridge. This can be stabilized further by adding string in a V shape between the hand lines via the main hawser.
At this point you will have discovered that you have positioned the sheer legs too wide and the hand rails can only be reached by an Orangutan. If this is the case, simply close the legs, re-guy, and retention the hand rails.
The hand rails need to be at least as tight as the main hawser, so the extra leverage on the guy lines means they need to be secured to pickets rather than tent pegs.
Of course the sheer legs need to be well secured and the main hawser may need to be tightened as it stretches.
 Here are some ideas to build rope bridges at camp or on a Scout night.
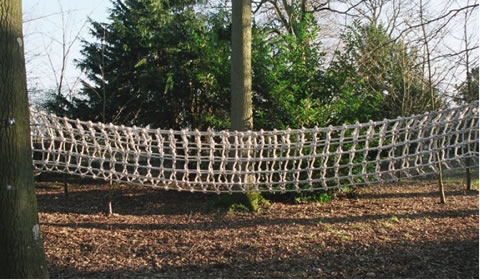 The simplest of the rope suspension bridges is a simple crawl rope stretched between two anchor points. The anchor points can be two sturdy trees at either side of the gap to be bridged. Make sure that the trees are solid and healthy and can take the load. You need a fairly sizable rope of at least 20 mm diameter. Protect the bark with wrappings of sacking or old canvas and tie off the rope with a round turn and two half hitches. For a short span the rope can be hand tensioned and then tied off on the opposite side. For a larger span you should use block and tackle either tied onto the rope or in the form of a "Handy Billy"