8-Strand Tuck Splice Class 1
Class 1 8-strand ropes are made in whole or in part from any of the following high modulus fibers: Olefin, polyester or nylon.
The eye splice is used to place a permanent loop in the end of a rope, generally for attachment purposes to a fixed point. An eye is also used to form the rope around a thimble, which is used to protect the rope, especially when it is to be attached to a shackle, chain or wire rope.
This splice is in accordance with Cordage Institute instructions for use in "Standard Test Methods for Fiber Rope" STM 6/80. This provides for the required strength retention for 8-strand (plaited) synthetic fiber rope as given in the Cordage institute Rope Specifications.
Getting Started
 Plaited rope is no more difficult to splice than 3-strand. It is made of 8-strands grouped in 4 pairs. 2 of these pairs turn to the left and 2 to the right. The illustrations show the 2 pairs turning to the left in white and the 2 pairs turning to the right in gray. They will be referred to as the "white" and "gray" pairs. Note: The gray pairs are diametrically opposite one another but at a 90° angle to the white pairs and vice-versa.
Tools Required: A splicing fid or marlinspike, sharp knife or scissors, plastic or masking tape, marking pen, 10-inches of twine.
Eye Size: The size of the eye is determined by bending the bitter end of the rope back over itself for a distance equal to the desired length of the eye plus a length of 10 pics (crowns).
Preparation: If the rope which you are about to splice is all of one color, mark those pairs which turn to the right so they will conform with the gray pairs in the illustrations. Count back a distance of 20 pics from the end and tie a string securely around the rope so it passes directly over the center of both pairs of gray strands. Place the knot so that it is directly on top of one of these pairs. It is important that this be tied securely to prevent slipping. Now, unlay the pairs of strands back to the string. Making sure not to mix, or twist them, tape the ends of the pairs together as shown in Figure A.
 STEP 1
Hold and lay the rope so that the pairs of white strands are on top and bottom with a knot to the right as you look toward the end.
STEP 2
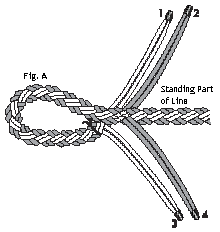
Bend the rope over to the desired eye in such a way as to keep the knot inside the loop as shown in Figure A.
STEP 3
Using the fid to make clearance and starting with the gray pairs, tuck them under the diametrically opposite white pairs as shown in Figure A. Make sure you do not disturb the lay of the pairs. Do not twist them so that the individual strands cross over one another in the pair.
 STEP 4
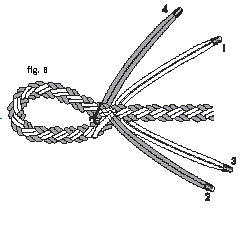
Now turn eye over, again using the fid to make clearance, tuck the white pairs under the diametrically opposite gray pairs as shown in Figure B. Note that in Figure B the splice is turned over from Figure A. The white pairs to be tucked should follow the white pairs of the standing part and the gray to be tucked should follow the gray piars of the standing part. The ends in the drawing have been numbered to help show their position as the tucks progress. Remember, rope splicing can be a claming process if you take your time.
 STEP 5
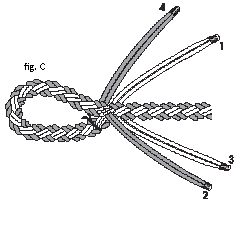
Now you have your eye with the first full tuck complete (a full tuck means inserting all 4 pairs); pull all 4 ends down firmly. Starting with the gray pairs, using the fid to separate, take another full tuck. By starting with the gray pairs you avoid having to go under 2 pairs at once. Your splice should now look like Figure C, (which now lays on the same side as Figure A). From here on, you should have no difficulty completing the rope splicing.
 STEP 6
Now starting with the gray pairs, make at least one more full tuck. With a very soft rope, it may be neceaasry to take a 4th or 5th full tuck.
STEP 7
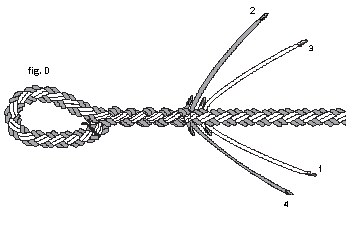
Having completed the 3rd tuck (4th or 5th if necessary), select the strand in each pair that is closest to the eye and tape it where it emerges from the tuck. Then cut off the taped strands as shown in Figure D.
 STEP 8
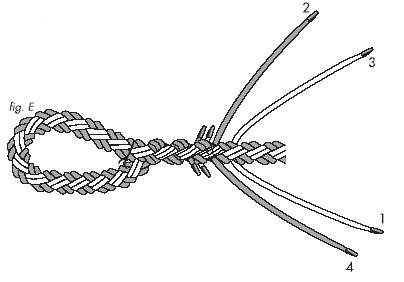
Now splice the remaining single strands just as before for another full tuck. The splice should now appear as shown in Figure E, which will lay on the opposite side as shown in Figure D.
STEP 9
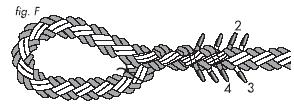
Tape first and then cut off the 4 single stands as shown in Figure F. The 8 ends may be heated and fused so they will not fray: however, take great caution to be certain that you fuse on the ends and do not damage the strands.
 STEP 10
A more professional appearance may be achieved by cutting the ends off flush and then taping or whipping the entire splice.
We hope you found these rope splicing instructions helpful. If you require any further assistance, feel free to call Jay @ 763-263-9835.