Knot tying Instructions
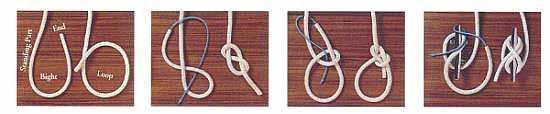
Bight and Loop
Like an earth worm, a rope has two indistinguishable ends. Everything in between is the "standing part". The simplest maneuver is a change of direction, called a Bight. A cross over or under is called a Loop. The end left hanging is called the "Bitter End".
Figure-of-Eight
Less complicated than the knot you put in your shoelaces, the Figure-of-Eight is an ideal basic knot for use at the end of a line to prevent a sheet or line from slipping through a block. Make an underhand loop, then bring the free end over the standing part and bring it under and through the loop.
Bowline
For a simple running loop, the Bowline is the sailor's best friend. Begin with a small overhand loop, make a larger loop and bring the free end through the first loop. Now form a bight by bringing the free end under and over the standing part, then back through the loop. This won't slip or snarl under strain, yet will untie easily with one tug on the bight.
Belaying
Endlessly winding a rope around a cleat is not Belaying. Loop the line around the base, under the arms of the cleat, then bring it up and over diagonally, around and under one arm, then over, around and under the other, in a continuous figure eight, securing the bitter end by tucking it under the last crossover.
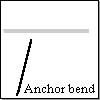
Anchor Bend
The two loops that swivel freely make the Anchor Bend perfect for making fast a line to an anchor, buoy or spar. Take two turns through the ring, followed by an underhand loop, then thread the bitter end through the turns and pull tight. You should give the bitter end an extra hitch around the standing part for greater strength.
Tug Boat Hitch
The Tug Boat Hitch is ideal for heavy towing, yet can be released under great strain when necessary. Take one or two turns around the towing post, cross the bight under, then drop the bight over the top. Now loop the bight back around the standing part, drop the bight over the top with a half twist, and pull taught.
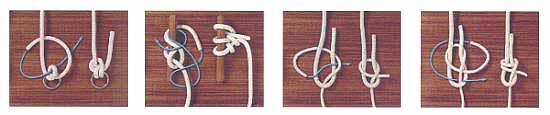
Single Sheet Bend
The Sheet Bend, used to tie two ropes together, is at its best when things are complicated by ropes of unequal size. Form a bight in the larger line. Thread the smaller line's bitter end through then under itself, and out over on the same side as the larger lines bitter end.
Double Sheet Bend
When the strain on the two ropes you are joining is particularly great, tie the Single Sheet Bend, as above, leaving enough length in the small line's bitter end for another loop around, under itself inside the bight, and out over again. To prevent slipping and jamming, always make sure that both bitter ends are on the same side of the knot.

Round Turn and Two Half Hitches
Formerly know as Rolling Hitch. Is especially useful when there is a strain on the line, since you can tie it with one hand while holding the line taut. Take two turns through the ring or around the post, then finish up with a clove hitch over the standing part. Keep this one set snug.
Clove Hitch
When a line has to be made fast to a pile or spar quickly, the Clove Hitch is the simple, speedy answer. A simple loop around the pile, followed by a second, with the free end crossed under and pulled tight, results in a hitch that gets even tighter as tension increases on the standing part.
Rope
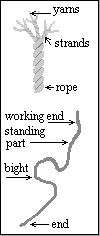 Rope is made from fibers twisted or woven together. Generally falling into two categories, natural and synthetic. Some natural fibers used are cotton, sisal, manila, and where people are trusted not to try to smoke it, hemp. Synthetic ropes are mostly Dacron®, nylon, polyethylene and polypropylene.
Unless they are braided, common ropes are made by twisting fibers (usually) to the right into lengths called yarns. Yarns are then twisted together to the left and called strands. Strands are twisted together to the right.
Most braided rope has a woven shell surrounding a core of fibers. It is more flexible and has less stretch than twisted rope.
When the strands are twisted to the right, it is said to be "laid" right-handed. So heavy rope laid this way should be coiled in a clockwise (left to right) manner. It is these twists in rope that give most knots their gripping power. So, a knot that works well with rope may slip apart when tied with a smooth monofilament fishing line.
When a knot is tied, fibers become bent, stretched, squeezed and broken. This weakens the strength of the rope, knots may be rated by percentages of how much havoc they cause on the overall strength of the rope. Some knots weaken a rope by 20%, some 50%. Add to this the age and the amount of use the rope has seen. For this reason, the rope and knots used for climbing have to be chosen with care.
Overhand Loop
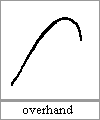 It doesn't get more basic than the overhand (thumb knot). It doesn't have much use other than a stopper knot.
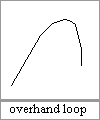 It is difficult to untie and weakens the rope. But it is the foundation of many other knots that you will find useful.
An overhand loop, or loop knot, is the simplest fixed loop you can tie. Like the overhand above, it is very difficult to untie.
You can use a variation of this to tie two lengths together, instead of doubling up one line, hold two lines together, and tie both as if one line, and form an "X" or a "Y" they will not come apart or slip. If you pass the doubled up end through the eye of the loop a second time, you will form a "surgeons loop" that is slightly stronger.
Reef Knot, Half and Double Hitch
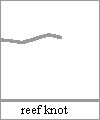 The reef, or square knot is a classic, used by sailors to bunch up sails, also for tying up your karate belt. It is used for tying two lines to bind things together. It is easy to tie, untie and adjust.
 Another way to tie this is tie two ends together as an overhand, then tie the two ends together a second time. When tied properly, the two ends will exit from the same side. If tied improperly, you will get a Granny knot.
A half hitch is a common way to end off many knots. Here is a single, followed by a double, half hitch. This will loosen and slide under use, when strained from different directions.
Figure of Eight or Bowline
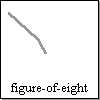 These two are similar in function to the overhand and overhand loop, and represent the next level up.
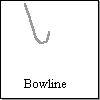 Figure of eight, another stopper knot, is larger than the overhand. It can be tied and untied and has less impact on the overall strength of the rope. You can double up a length of line and tie a figure eight and produce a better all around fixed loop.
Bowline is the most widely used fixed loop. Much of the language of sailing and knotting is influenced by the slang of British sailors. "Main sail" is pronounced "mains" etc. The correct way to say it is bo-lun'. The bowline is easy to tie, untie and strong.
Anchor Bend or Fisherman's Knot
 Anchor Bend is really a hitch. Note the similarity to it and the double half hitch. Slipping the working end through the turn locks the knot in place, preventing it from sliding.
 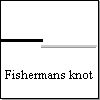 For tying a line around a spar, I find using an extra round turn so that there is one on both sides of the standing part, even holds it in place better.
Fisherman's knot is a simple way to join two lengths of rope. It doesn't work at all with monofilament fishing line or polypropylene.
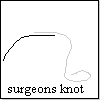
Trilene or Surgeon's Knot
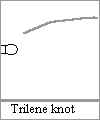 The trilene was developed by the company that makes the fishing line. It's about the best knot for tying a monofilament line onto a hook or lure.
 TIP: Monofilament line should be moistened before closing the knot to keep down friction heat that can weaken the line.
The surgeons knot is used to tie two lengths of monofilament line together. Note that one end will have to be worked through the loop. So, if you are tying two long lengths together, the end that will be worked through the loop should be wound around something or left on a spool. The loop made in this case should be large enough to pass it through the eye.
We hope you found these rope splicing instructions helpful. If you require any further assistance, feel free to call Jay @ 763-263-9835.