Double Braid Rope End For End Splice
Machovec is proud to bring you these rope splicing instructions. Eye splicing a rope is one of the most asked for procedures. Having a permanently fixed loop (eye splice) on a rope end removes the need to tie and then untie a knot each time you wish to use it. Rope splicing is a very strong method of fixing a loop eye; as the rope is pulled tighter so the spliced strands become more and more squeezed and locked into place. Rope splicing removes the worry of a knot becoming undone and a spliced eye is less bulky. You can buy 3-strand, 8-strand or 12-strand rope with an eye already spliced in or you you can make your own by following these instructions for eye splicing a rope.
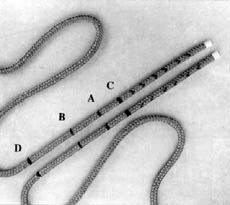
STEP 1 - Mark & Extract
Mark the two ends in the same manner as step 1 of the Double Braid Eye Splice directions. (Use 1 short fid length as the measurement from A to B to replace the eye size) Tie slip knots on each end as per previous directions. Extract and mark cores per step 2 of the eye splice directions.
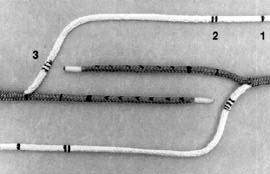
STEP 2 - Insert Cover & Taper
Attach the fid to cover tail 1 and insert into core 2. Repeat with cover tail 2 and core 1. Cut and remove strands per step 4 in eye splice instructions.
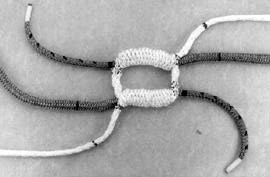
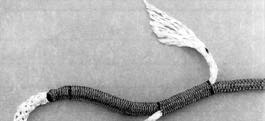
 STEP 3 - Insert Core into Cover
Insert core tail 1 into cover tail 2 at C, per step 5 in eye splice directions. Repeat with core tail 2 into cover tail 1.
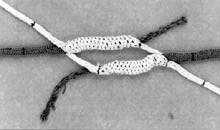
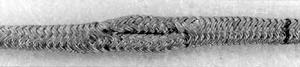
 STEP 4 - Tighten Crossover & Bury Tails
Taper the core tails as per step 6 on eye splice instructions. Hold the rope at the crossover and smooth down each side to bury tails.
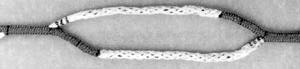
 STEP 5 - Bury the Crossover
To bury the crossover points, use the directions in step 7 of the eye splice instructions. Some slack may develop between points A and B, the eye portion of the splice. Smooth the slack from A toward B and sharply yank A away from B. Stitch and whip each end at mark B and seize the crossover area.
*Constant diameter splices, which reduce the diameter of the crossover area to approximate the ropes actual diameter, will significantly reduce strength performance.
We hope you found these rope splicing instructions helpful. If you require any further assistance, feel free to call Jay @ 763-263-9835.